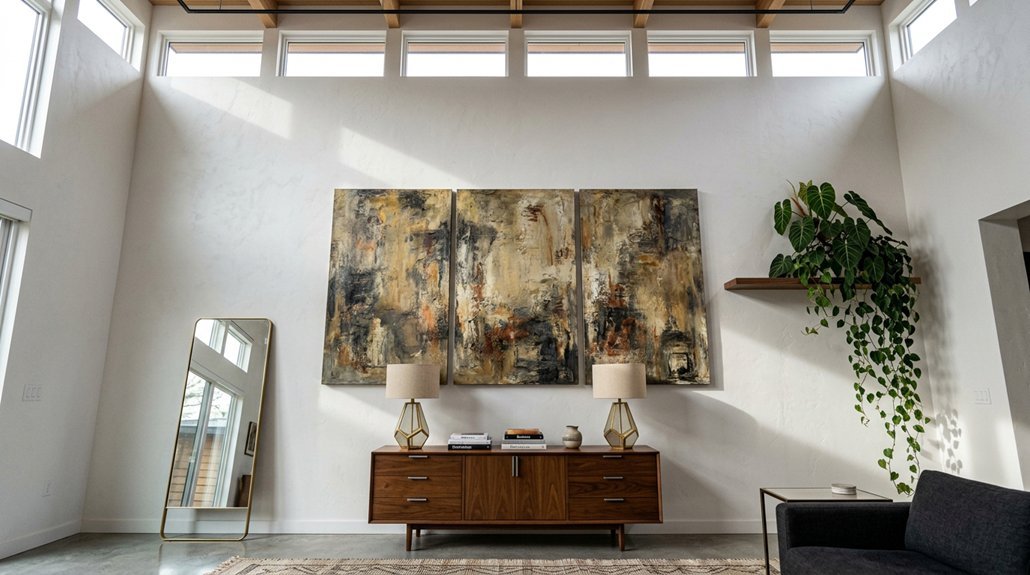
You want a gallery wall that commands attention without feeling chaotic. Start with intention: every frame competes for focus until you establish hierarchy. The difference between a scattered display and a curated installation comes down to precision—measurements, alignment, and that essential 57-inch centerline. But before you touch a hammer, you’ll need to solve one critical problem that determines whether your arrangement succeeds or falls flat.
Choose Your Gallery Wall Location and Style
Where do you begin when building a gallery wall that commands attention? You start with location and intention.
You select a wall with unobstructed sightlines, establishing a clear focal point that anchors the room. You avoid cramped corners or competing visual elements that dilute impact.
You define your aesthetic first—clean modern, eclectic, or monochrome—to inform framing choices and palette cohesion. This decision shapes every subsequent move.
You center your layout at 57 inches from the floor: eye level for optimal engagement. You maintain 2-3 inches between pieces, allowing breathing room while preserving unity.
You position your largest work first, grounding the arrangement. You build outward with smaller pieces, achieving balance through intentional asymmetry. You craft spatial rhythm through disciplined spacing, transforming individual elements into architectural statement.
Recommended Products

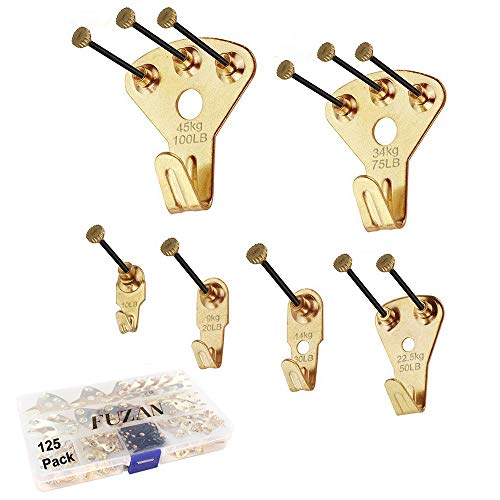
EFFORTLESS ORGANIZATION: Our 303pcs Heavy Duty Picture Hanging Kit boasts an exceptional design with categorized compartments, saving you precious time that would otherwise be spent searching for the right hardware. Plus, when you're done using it, everything neatly tucks away, eliminating any post-project mess. Can replace picture hanging strips.

Easy Picture Hanging with Precision : Hang your saw-tooth or wire picture frames effortlessly without the hassle of measuring. Our unique positioning system ensures accurate nail hole placement every time, eliminating guesswork.

Get your gallery wall up effortlessly with Mr. Pen picture hanging kit, featuring 20 D-ring picture hangers, 20 screws, and 20 aluminum sleeves. This all-inclusive kit provides all you need to hang your art securely.
Measure and Mark Your Wall Space
Precision demands translation from vertical to horizontal—a shift that lets you command the geometry before lifting a hammer. You’ll measure your wall space horizontally and vertically, then replicate those dimensions on your floor plan using a measuring tape to establish true scale.
Map your available wall space with frame sizes in mind, accounting for architectural features that constrain your composition. Mark bottom boundaries and lateral limits on the floor with painter’s tape—these placement references anchor your spatial logic. Calculate margins between pieces now; precise spacing separates amateur clusters from curated galleries.
Your floor becomes the laboratory. Here, you’ll verify proportions, adjust tensions, and resolve conflicts before committing to hardware. Master this translation, and you’ve built the foundation for flawless execution.
Recommended Products

【Three Sizes】The 5-inch and 10-inch contour gauges can be spliced together so that you have three sizes of gauges - 5-inch, 10-inch, and 15-inch. 5-inch is perfect for tight spaces; 10-inch suits for most objects; and 15-inch is for larger objects.


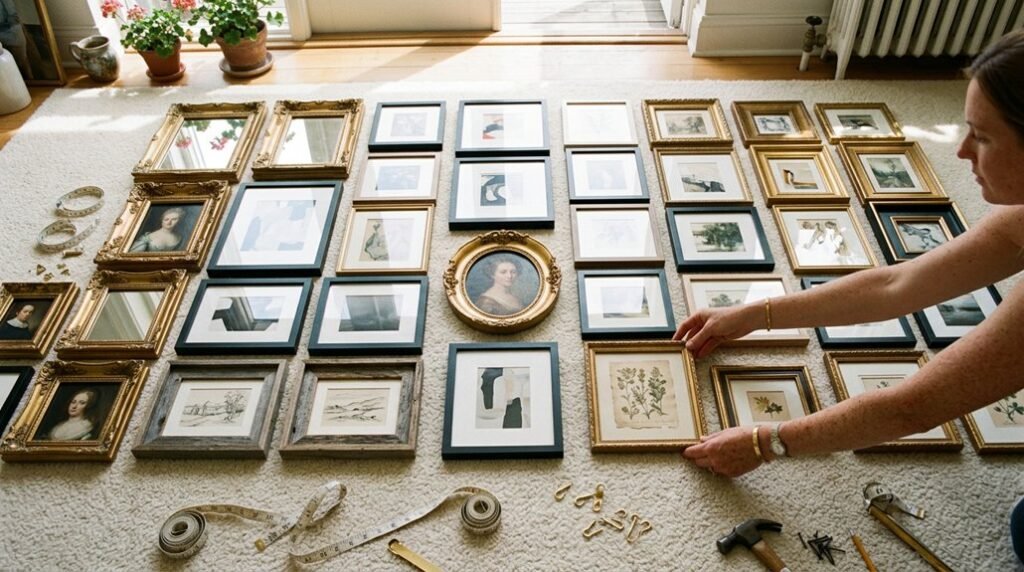
Lay Out Your Gallery Wall on the Floor
How do you transform a blank wall into a composed statement without risking misplaced holes? You’ll lay out your gallery wall on the floor first.
Measure your wall space, then mark the floor to reflect your intended frame layout.
Create multiple layout options—Bottom Aligned, Top and Bottom Aligned, Top Aligned, or Middle Aligned.
Produce a clear floor plan by marking the bottom edge and two ends of your measured space.
Position your frames within these marks, aligning bottoms to the measuring tape.
Maintain spacing at one to two inches between pieces.
Expect to perform multiple adjustments.
Balance large and small frames until you achieve visual harmony.
This soft, iterative process lets you refine compositions without committing to misplaced hardware.
Finalize your layout before advancing.
Recommended Products

PERFORMANCE: Faster, easier prep with precision vs. applying 3M paper-backed tapes by hand

READY. SET. TAPE!: 1 roll of 1.41 inches x 60 yards tan Scotch General Purpose Masking Tape, a versatile solution for painting, labeling, bundling and general masking applications on non-damageable surfaces with a 3-inch core

HOLDS UP TO 2 POUNDS: One package of the Command Clear Medium Wall Hooks includes 12 clear wall hooks and 24 adhesive strips; each adhesive wall hook can hold up to 2 pounds
Hang Your Frames With Precise Spacing
Why risk uneven gaps when you can hang with confidence? Execute your gallery wall with precision by maintaining consistent spacing—typically one to two inches between frames—to achieve professional cohesion.
Translate your floor layout directly to the wall. You’ve already established perfect alignment and spacing during your dry-fit; now you’ll replicate it exactly. Mark nail positions precisely, accounting for each frame’s specific wire offset from both top and side edges. This technical approach eliminates guesswork.
Anchor your largest pieces first at your central reference point, then build outward with smaller frames, checking measurements as you go. You’ll likely need adjustments—recheck spacing and alignment before committing each hole.
Your final hanging mirrors your perfected floor arrangement: balanced, intentional, visually unified. Execute this phase with discipline, and your gallery wall achieves gallery-quality results.
Recommended Products

High Quality Material:This photo frame backing clip is made of high-quality iron,which is hard and durable.The electroplating process prevents rust and makes this picture frame back clip less prone to damage after prolonged use.

100 PCS Picture Frame Turn Button Fasteners: 0.8 inch/2 cm in length, 0.35 inch/0.9 cm in width. Small and simple design basically not affect original appearance.

Multipurpose - These clips secure your 3D printer's glass bed, preventing warping and shifting. They also function as minimalist picture frame hangers for DIY home decor, making frame hanging simple
Add Texture, Light, and Final Adjustments
Once you’ve secured every frame, elevate the installation beyond basic arrangement by manipulating surface depth and material variation. Mix flat profiles with sculpted frames on your gallery walls to build texture. Layer in mirrors, canvases, or textiles under glass to interrupt visual monotony and amplify depth.
Position lighting strategically—picture lights, sconces, or adjustable track fixtures—to cast shadows that emphasize dimension and preserve color accuracy. Select dimmable, warm-toned bulbs (2700K–3000K) to unify subdued palettes.
Introduce subtle dimension with floating shelves, trailing plants, or forward-mounted pieces that generate gentle shadow play.
Execute final adjustments by eye-balling centering from wall edges, then refine spacing to 2–3 inches and perfect alignment. These calibrated touches transform competent arrangements into sophisticated, cohesive installations.
Recommended Products

COMPLETE PICTURE HANGING KIT IN GOLD & BLACK This versatile picture hanging kit includes 50 gold and 50 black sawtooth picture hangers, 50 d ring picture hangers in both finishes, 150 screws, and a screwdriver, all neatly organized in a sturdy storage box. The upgraded dual-color system provides the perfect picture hanging hardware for any frame style.
【Wide application】As an effective tool, 125 PCS picture hangers is widely applicable to most items in the home or office. It can hold 10-100 pounds and easily hang photos, decorations, clocks, clothes, kitchenware, small ledges, canvas.

PREMIUM METAL BUILD: Our bronze heavy duty picture hangers are made of reinforced high-grade steel—thicker and sturdier than standard options. With exceptional load-bearing , they hold art, mirrors, or clocks securely, no bending or slipping.
Conclusion
You’ve methodically built a gallery wall that commands attention. Your strategic placement, precise measurements, and intentional spacing create visual rhythm and professional polish. Step back, assess the balance, adjust lighting to eliminate glare, and refine until every piece resonates. This curated installation isn’t merely decoration—it’s your signature. Own it.
Recommended Products

【Multi Purposes】Being used with other tools such as pallet buster, crowbar, bradawl, carpentry tools, marking tools, leveler tool, oscillating tool, caulking tool, and so on. Be it vinyl tiles laying, tiling, laminate flooring, carpet cutting, wallpapering, wall panelling, wood working, winding pipes, moulding, welding, DIY, the JOREST contour gauge comes in handy while profiling work.

9 in 1 measuring and marking tool with built in Dual levels and a sliding bevel

【High-quality materials】The multi angle measuring ruler made of high quality aluminum alloy material, anti-fall abrasion. the aluminum alloy multi angle measuring rule is super wear-resistant, can be used for a long time, no need to worry about corrosion, to ensure the durability of multi angle measuring rule.