You want filtered daylight and total darkness, but you’re not sure which curtain goes next to the glass. Mounting the sheer on the wrong side traps heat and ruins the effect, while proper placement creates elegant depth. There’s a specific hardware setup that determines how much light you control each morning. You’ll need to know exactly where to hang each layer before you drill a single hole.
Pick Your Hardware: Double Rods or Track Systems?
How do you want your curtains to move? Your hardware choice determines how well your window treatments function.
For true independent control of sheer curtains and blackout curtains, you’ll want a double rod or double track system. A single rod with sewn-in sheers limits your movement and light control—you can’t adjust layers separately.
A double rod setup positions your sheer curtains closer to the glass and blackout curtains on the outer rod. This two-layer setup lets you filter daylight through sheers or block it completely with blackouts. Track systems offer smoother operation, especially for tall windows or sliding glass doors where gliding matters.
The Shade Store recommends two separate layers on two rods for optimal depth and aesthetics. When you’re layering window treatments, invest in proper hardware—your daily light control depends on it.
Recommended Products
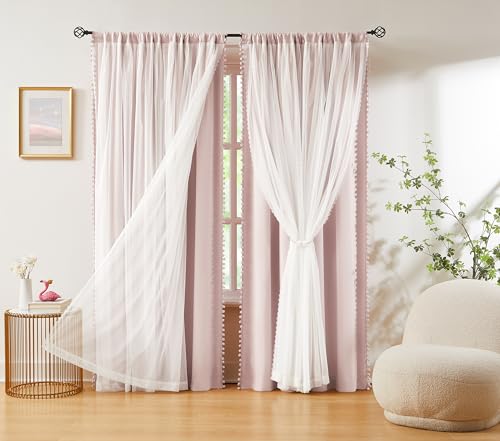
POM POM CURTAINS WITH SHEER OVERLAY: 52"W x84"L/ Panel, Comes in 2 Panels of double layered mix and match boho blackout curtains, Soft Pink, Recommend ordering 1.5 to 2 times rod width for proper look and fullness( 1 pair is suitable for window in 42"-70" wide). Holdback is not included, bonus matching 2 tie backs.

ELEGANT: The Catarina curtain panels offer both the function of a sateen woven room darkening blackout curtain paired with the fashion of a sewn in sheer panel for layered sophistication

Ready Made:Package includes 2 panels of double layered blackout and sheer curtains with tie backs,measuring 37Wx84L inch each panel,3 inch rod pocket back tab design.Recommend to order 2-3 times rod width for proper look and fullness.
Which Layer Goes First? How to Layer Sheers Inside, Blackouts Outside
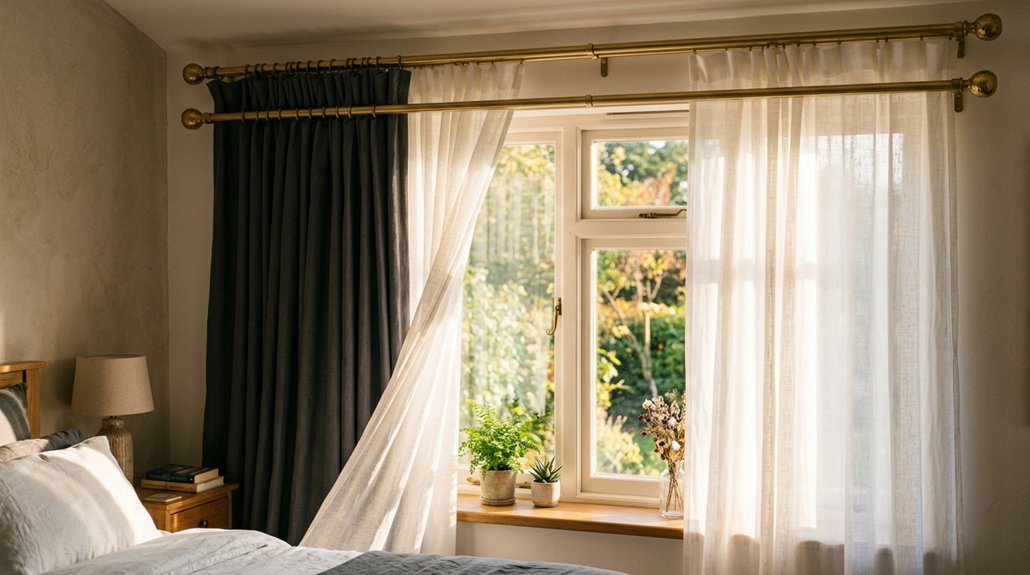
Your hardware is set; now it’s time to decide what hangs where. The layering order for layered curtains matters immensely. You’ll position sheer curtains as the inner layer closest to your window glass, while blackout curtains hang as the outer layer. This configuration maximizes light control flexibility throughout your day.
Place your sheer curtains on the inner rod where they’ll diffuse harsh sunlight and soften your room’s ambiance. Mount your blackout curtains on the outer rod for complete privacy and darkness when you need it. Reversing this arrangement hides the delicate sheer texture and eliminates the functional benefits you’ve invested in. Lighter sheers paired with darker blackout drapes create visual depth and striking contrast. Following this proper layering order ensures your window treatments operate smoothly and deliver exactly the atmosphere you want.
Recommended Products

Dual Track for Layered Curtains Designed for sheer and blackout curtain combinations, creating flexible light control and enhanced privacy for modern living spaces.

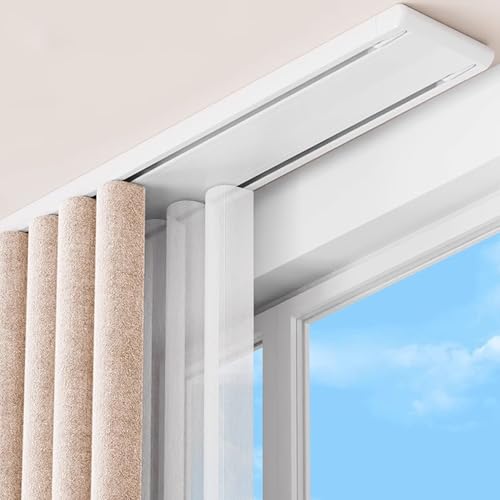
Ceiling-Mount Dual Curtain Track Design: This heavy-duty ceiling-mount dual track system is constructed from aluminum alloy, it ensures long-lasting performance even when supporting heavier curtain fabrics. The dual track feature allows you to smoothly operate two separate layers of curtains, this enables ultimate flexibility in light management and privacy throughout the day. Perfect for living rooms, bedrooms, office or commercial spaces

【Ceiling-Mount Dual Track Design for Layered Curtains】This ceiling curtain track set features a premium dual track system for ceiling and wall mounting. The double track rails are crafted from rust-resistant aluminum, supporting 2 curtain layers (sheer + blackout) while resisting sagging in bathrooms/kitchens.
Hang Both Layers: Spacing, Height, and Alignment
Where exactly should you position each rod to achieve that seamless, professional look? You’ll use a double curtain rod to place the sheer layer closest to the glass and the blackout layer outside, ensuring independent operation and precise spacing.
Mount the rods at least 8 inches above the frame and extend 8 inches beyond each side for optimal light control and stackback.
When adjusting height, position the blackout layer slightly higher or equal to the sheer layer to balance light diffusion with privacy while keeping the inner layer visible when opened.
You’ll ensure floor-grazing lengths for both layers to avoid choppiness.
Align the vertical hems evenly so your Layered Sheer and Blackout panels create a clean, flush appearance when closed.
This Layered approach delivers polished, functional results.
Recommended Products

【PACKING SPECIFICATIONS】: 2 pcs of white curtain rods, which can be extended from 26 to 39 inch, and the best use range is 28 to 36 inch,Scalable without drilling.

READY MADE: 2 panels sheer curtains per package. Each panel is 54" wide and 84" long when hanging as a flat. One of the grommets' inner diameter is 1.6". Purchase curtain whose width is 1.5-2 times wider than your window will form a nice look.

Room Darkening Solution: The double curtain rod features a wrap around design, which creates a tight seal between the wall and curtains, effectively blocking light and reducing outside noise to help you create a comfortable and cozy indoor environment.
Four Ways to Adjust Your Sheer and Blackout Layers
Why settle for static window treatments when you can control light and privacy throughout the day? You can layer curtains strategically to transform your space with flexible daylight adjustment.
First, mount your sheer curtains on the inner rod closest to the window and blackout drapes on the outside rod. This setup maximizes depth and visual interest while giving you precise light control.
Second, close your sheers alone to diffuse harsh glare while maintaining a bright, airy feel. You’ll filter sunlight without sacrificing daytime privacy.
Third, draw both two layers of curtains completely when you need total darkness and complete privacy for sleeping or screen viewing.
Fourth, experiment with overlapped configurations on one rod or separate rods to customize your window treatments further. These adjustable options ensure your layered system works beautifully from dawn to dusk.
Recommended Products

【 TVWOO Hidden Curved Blackout and Multi-Use】 Wrap around black curtain rods design inspiration comes from lovely pet cat's paw. Metal thicken hidden curved blackout design brings excellent blackout effect. Room darkening single window rod suitable for various living room,bedrooms,dining rooms and kitchens,door window side, hallway aisles,outdoor curtain rods for patios,can be ceiling-mounted or wall-mounted to meet your needs in various scenarios.

Easy to Install and Detachable: Just need to put the assembled curtain rod into the base. It is easy to take the curtains off when you need wash or change different curtains, just put the rod from the base. No need to disassemble the pole.

Easy to Install and Detachable: Just need to put the assembled curtain rod into the base. It is easy to take the curtains off when you need wash or change different curtains, just put the rod from the base. No need to disassemble the pole.
Pair Colors and Textures for Designer-Level Depth
How can you elevate a basic layered window treatment into something that feels professionally designed? You master color pairings and texture interplay between sheer curtains and blackout drapery.
Start by pairing lighter sheers with heavier dark drapes to create depth and contrast. You define your scheme by placing a dominant hue on the blackout layer and a secondary tone on the sheers, influencing mood through strategic layering curtains. You achieve understated elegance with a monochrome palette or heighten drama through bold contrast.
Consider textured fabrics like self-patterned weaves on base sheers, avoiding bold patterns on both layers. You must plan how pattern read through light diffusion affects the final look—lighter sheers can wash out blackout patterns, so you choose designs that remain distinct when backlit.
Recommended Products

WHAT'S IN THE PACKAGE?: Each set includes 2 pieces branch print sheer curtain and 2 pieces blackout curtains. Each curtain panel measures 54 wide by 84 inch long and finished with 8 grommets with 1.6 inch diameter that fits well with standard curtain rods, making them easy to install and move along the pole.

100% Blackout: Designed with a specialized shading layer, these Blackout curtains 100% block out light while providing thermal insulation, noise reduction, and total privacy—making them the perfect choice for night shift workers, light sleepers, or anyone seeking a peaceful, undisturbed environment

【Basic Information】 The grommet top has an inner diameter of 1.6 inches. Each curtain panel is available in 35-inch and 52-inch width options. Available lengths: 63 inches, 72 inches, 80 inches, 84 inches, 90 inches, 95 inches, 102 inches, 108 inches, and 120 inches. Each set includes 2 detachable tiebacks.
When to Add Shades: Three-Layer Setups That Work
When do you need more than two layers? You add a third when you crave maximum flexibility for light control and privacy throughout your day.
A three-layer setup combines sheer curtains closest to your window, blackout curtains on an outer rod, and layered shades completing the system. You position the inner sheer to filter morning sun while maintaining your view. You draw the blackout curtains for complete darkness and privacy at night. You adjust the fabric shade independently to modulate harsh afternoon glare without sacrificing the airy aesthetic of your inner sheer.
This configuration lets you exploit vertical shade movement alongside horizontal curtain draws. You balance your outer layer to keep your inner sheer visible as the focal point when the blackout remains open, ensuring your embroidery or texture stays center stage.
Recommended Products

Elegant Style for a Cozy Look: Lino Rosa's new arrival.Featuring a delicate pom-pom dot pattern, these curtains add a soft, textured charm to your bedroom, living room, nursery or girls room. The sheer overlay design makes them an aesthetic choice for creating a dreamy and inviting ambiance for home decor.

Talia Double Layer Sheer and Room Darkening Blackout Indoor Curtains 2-Pack

Ready Made:Package includes 2 panels of double layered blackout and sheer curtains with tie backs,measuring 37Wx84L inch each panel,3 inch rod pocket back tab design.Recommend to order 2-3 times rod width for proper look and fullness.
Bedroom vs. Living Room: Where to Place Each Layer
Where you install each layer depends entirely on the room’s purpose. In your bedroom, you’ll want near-total darkness, so pair white sheers with 90%+ opacity blackout curtains. This layering creates a restful environment for sleep.
For your living room, choose neutral lightweight sheers with 70–85% opacity blackout to diffuse daylight while preserving views when desired. Deeper colored blackout fabrics work best in living areas for added privacy.
You’ll mount the sheer layer on the inner rod, closest to the window, and the blackout layer on the outer rod. This window treatment arrangement gives you adjustable light control throughout the day. Keep the sheer layer visible when you open the blackout for continuous daylight diffusion; close the blackout when you need darkness.
Recommended Products

Sturdy & Durable Aluminum Build: Made from premium aluminum alloy with a reinforced silent strip, this double curtain rod is tough, rust-resistant, and built to last. The surface stays bright and smooth without fading or warping over time, while the thickened brackets provide extra strength and long-term stability
【𝑬𝒂𝒔𝒚 𝑰𝒏𝒔𝒕𝒂𝒍𝒍𝒂𝒕𝒊𝒐𝒏】Tracks longer than 39 inches (100 cm) will be sent in sections, and we will provide connectors to ensure the pulleys pass smoothly. This double curtain track set includes tracks, pulleys, two side covers and a full set of screws
【𝑬𝒂𝒔𝒚 𝑰𝒏𝒔𝒕𝒂𝒍𝒍𝒂𝒕𝒊𝒐𝒏】Tracks longer than 39 inches (100 cm) will be sent in sections, and we will provide connectors to ensure the pulleys pass smoothly. This double curtain track set includes tracks, pulleys, two side covers and a full set of screws
Test Swatches Before You Commit
Why risk a costly mistake when you can preview your choices first? Order free swatches through the “Order Swatches” process, and you’ll receive your kit of 20 popular options within 1–3 days. Compare color and texture under real lighting in your actual hanging location. Test how sheer and blackout fabrics interact throughout the day—morning sunlight reveals different qualities than evening shadows. Layer the swatches together to assess light control and visual depth. Room testing captures time-of-day changes that showroom lighting misses. Start with The Most Popular Collection if you’re unsure which swatches to choose. This simple step prevents expensive errors and ensures your layering achieves the exact ambiance you’ve envisioned before you commit.
Recommended Products

LUXURY HOTEL STYLE DESIGN – Upgrade your bathroom with a hotel style waffle weave shower curtain featuring a removable snap-in waterproof fabric liner and mesh top window. Elegant textured fabric creates a modern spa-inspired bathroom while complementing any décor.

CURTAIN RINGS CLIPS PACKAGE: Set of 40 strong curtain rings with clips. Clip rings for curtains decorative drapery window.

CURTAIN RINGS CLIPS PACKAGE: Set of 40 gold color curtain rings with clips. Clip rings for curtains decorative drapery window.
Conclusion
You’ve got everything you need to layer sheer and blackout curtains like a pro. Start with the right hardware, position sheers closest to your window, and mount high and wide for that airy, designer look. Play with colors, textures, and configurations until you find your perfect balance of light and privacy. Test those swatches, trust your instincts, and enjoy the depth you’ve created.
Recommended Products

Curtain rod for window treatment in a bedroom, living room, or other living space
Room Darkening Solution: The double curtain rod features a wrap around design, which creates a tight seal between the wall and curtains, effectively blocking light and reducing outside noise to help you create a comfortable and cozy indoor environment.
Easy to Install and Detachable: Just need to put the assembled curtain rod into the base. It is easy to take the curtains off when you need wash or change different curtains, just put the rod from the base. No need to disassemble the pole.